07 October 2018

As you can tell, I have not been blogging anymore. Life got busier and it got to be too much for me. I am definitely still cooking, and I still have a desire to share recipes, however, so I now use Instagram for that purpose. Posting to Instagram is faster and easier than typing out a blog post on the computer. I have also changed my diet significantly in the last three years. My husband and I eat low carb/keto. I have lost 94 pounds and am still making progress. So if you have any interest in low carb/keto, please find and follow me on Instagram. @lowcarblesa  I post my weekly meal plan each Monday and throughout the week I post pictures of my dishes with the recipe included, in a format super easy to screenshot for future reference.


So if you are interested in low carb/keto meal plans and family-friendly recipes, check it out. 

Even though I don't plan to update this blog any longer, I will still maintain it so the 669 recipes I have posted aren't going anywhere. I had so much fun writing this blog for 9 years and really appreciate all of my readers and the fellow bloggers I met and friended over the years. This blog was a labor of love and is something I will always treasure.

Happy Cooking!


What I'm Reading Right Now


goodreads.com

18 August 2016


It's time for this month's Improv Challenge, hosted by Nichole of Cookaholic Wife

This month's ingredients were garlic and rosemary.  So many possibilities!  I am not a rosemary fan at all; it just tastes too much like pine needles to me.  But I still wanted to participate this month, so I made something with rosemary anyway.

I had recently seen a yummy looking zucchini recipe that I wanted to try.  According to Elle shared some zucchini that was baked with parmesan and herbs on top.  The photos are beautiful (unlike mine, lol! Having some camera issues at the moment), and I just couldn't wait to try it.  This challenge was the perfect opportunity.

Here is my version.

Parmesan Herb Zucchini

Ingredients:
2 medium zucchini, cut into ¼” slices
Olive oil
½ cup freshly grated Parmesan
½ tsp garlic powder
1-2 tsp rosemary, chopped

Preheat oven to 350°.

Place zucchini slices on a rimmed baking sheet (I use stoneware).  Brush both sides lightly with olive oil (I actually used an olive oil spray).

In a small bowl, gently mix together the parmesan, garlic powder, and rosemary.  Put about 1 tsp of this mixture on top of each zucchini slice.

Bake in the preheated oven for about 10 minutes, then place under the broiler for a few minutes until the cheese begins to brown on top.  Remove and serve warm.

Makes 4 servings.

So since I'm not a huge rosemary fan, what I did was put rosemary on just a few of them, and for the others I used one of my favorite herb blends from Penzeys, Sunny Paris.  This would work well with any herb, fresh or dried.  I used garlic powder because I was out of fresh garlic, but fresh would be fine as long as it was very finely minced.  The garlic powder worked well for me; it was just the right amount of garlicky-ness I thought.

I was very pleased with this zucchini.  It was a nice change from simply sauteeing it or throwing it on the grill.  Zucchini has too much water in it to ever get really "crispy", but these did brown beautifully on the bottoms.  I had some that were about 1/2" thick and some that were 1/4" because I couldn't decide what would work better.  My zucchini were too big to slice in half lengthwise like According to Elle did.  So I thought slices were the way to go.  I ended up liking the 1/4" slices better.  They browned more on the bottoms and they edges got more browned and delish.

My husband and I both loved this zucchini.  Unfortunately, my kids aren't big zucchini fans, so they opted for baby carrots instead.  Their loss!  I can't wait to make this again.

Be sure to check out all the other great garlic and rosemary recipes below and come back next month to see what I make with sausage and mustard.  I already know what it is and I can't wait!


23 July 2016


It's getting to be that time of year, when everybody is looking for ways to use up their overabundance of zucchini. I am not a gardener, so I don't have that problem, but I love zucchini and am therefore always looking for new ideas.  This is a great zucchini recipe I threw together for dinner last night.  

Italian Stuffed Zucchini

Ingredients:
1 lb. ground beef
3 large zucchini
1 cup pizza or marinara sauce
2 tsp Italian seasoning (I use Tuscan Sunset)
1 cup shredded Italian cheese

Directions:
Preheat oven to 350°. 

Brown ground beef in a skillet.  Drain off grease.

Meanwhile, slice each zucchini in half lengthwise; do not trim off the ends.  Using a grapefruit spoon, scoop out the insides, making them into boat shapes.  Dry them off with paper towels.  Place them on a baking sheet.

When the beef is browned and drained, stir in the pizza sauce and the Tuscan Sunset.  Fill the zucchini with the beef mixture.  Bake in preheated oven for 15 minutes.  Top with shredded cheese and return to the oven for another 10 minutes, or until zucchini has reached desired tenderness.

Makes 4-6 servings.

This makes for such an easy dinner.  I spent all afternoon in the kiddie pool in the backyard with my daughters. They could live in that thing!  We lose all track of time in the pool, so I sent Lena in to the house to see what time it was. Five til five. Oops, time to make dinner! I toweled off, got in the kitchen, and had this ready in about half an hour.  

A note about the number of servings: My husband and I ate two each.  We eat low carb, so this was all we ate.  If you are serving this as a main dish, with side dishes as well, probably one per person would be sufficient.  My girls aren't crazy about zucchini, so last night I only made 4 of these for my husband and myself, and I mixed the remaining meat mixture into some pasta for my daughters.

I use pizza sauce because it is the lowest carb tomato sauce I can find and my husband much prefers smooth sauces to chunky ones. But you can use whatever tomato/marinara sauce you like best.


What I'm Reading Right Now


goodreads.com

21 July 2016


I haven't participated in an Improv Challenge for a couple of months, but I decided I need to get back into it! I had been slacking in my duties as the administrator, so last month I handed the reins over to Nichole of Cookaholic Wife.

This month's ingredients were peaches and cream. Fun! At first I thought I would bake something for my kiddos, but then my mother-in-law decided to take them off our hands for a week. Nice! I am really enjoying the quiet and my husband and I have enjoyed going out and socializing more than we usually do, but I am missing them and will be glad to have them home tomorrow.

I made these muffins for a monthly study group my husband leads at our church.  My contribution to the study each month is some sort of baked good.  The timing worked out perfectly this month to try this recipe out.  I found this recipe at one of those Starbucks copycat websites, even though I've never seen peaches and cream muffins in a Starbucks! I changed things up a bit. Here's my version.

Peaches and Cream Muffins

Ingredients:
4 cups flour
2¾ cups sugar, divided
2 tsp baking powder
½ tsp salt
1 tsp Pie Spice
¾ cup canola oil
2 cups milk
3 eggs 
1 tsp vanilla
6 small-medium peaches, peeled and diced
8 oz. cream cheese
1 tsp almond extract
Sugar in the Raw

Directions:
Preheat oven to 350°.  Coat two and a half muffin tins with baking spray.  Set aside.

In a large mixing bowl, combine the flour, 2 cups sugar, baking powder, salt, and Pie Spice.  In a separate bowl, mix together the canola oil, milk, eggs, and vanilla.  Add the wet ingredients to the dry and gently incorporate.  Gently fold in the peaches.

In another bowl, soften the cream cheese in the microwave.  Stir in the remaining ¾ cups sugar and the almond extract.  The mixture should be somewhat firm; if it’s too loose, put it in the freezer for about 10 minutes.

Fill muffin cups about halfway with the peach muffin batter.  Drop a dollop of a heaping teaspoon of the cream cheese filling into each one.  Top with remaining batter.  Sprinkle tops with sugar in the raw.

Bake for 30-35 minutes or until edges and sides are golden brown.  Remove from oven and let cool 10 minutes in the pan, then remove to a cooling rack to cool completely.

Makes 2½ dozen muffins.

I used fresh peaches instead of canned.  I thought canned would be too mushy.  I was very disappointed, when I began peeling my peaches, to find that they were white-fleshed.  :(  I did not realize I bought white peaches.  I just saw "Peaches .99/lb!" at the grocery store and grabbed some.  I was a little bummed because I was looking forward to that pop of bright orange color they would provide; instead, these muffins are pretty mono-chromatic.  But I wasn't about to drive back to the grocery store.  So it is what it is!  They will definitely be more visually appealing if you use regular peaches.


Not a great pic; I realized sometime after I took it that there was a smudge on my camera lens.  But you can see how I put these together.  I stuck my cream cheese filling in the freezer for 10 minutes before filling because I kind of over-softened the cream cheese and the mixture was pretty runny.  I was afraid if I put it in like that, that it would just kind of ooze into the batter and become one with it, which is not what I was going for.  So that 10 minutes in the freezer helped to firm it up so the little cream cheese blobs kept their shape while baking.

The original recipe didn't call for any spices or the vanilla extract.  I thought the batter needed a little something, so I added some Penzeys Pie Spice and vanilla.  The pie spice is nice; but if you don't have that, you can use cinnamon or a combination of cinnamon, nutmeg, and ginger.  You could even use a pumpkin pie spice or an apple pie spice if you have it.  (Side note: I recommend the pie spice; my kids love it on their applesauce! It contains vanilla sugar; yum!)

I was very worried after I put these in the oven, because I thought that I had overfilled the muffin cups.  I always end up with more muffin batter than what the recipe calls for.  Why?  I have no idea.  The recipe was supposed to make 2 dozen muffins.  I filled them pretty much completely to the top, and still had enough batter and filling leftover for another half dozen.  I grabbed my jumbo muffin tin and made a few jumbos.  (Stuck them in the freezer for when my daughters come home. So they're not missing out!)  With filling the cups so full, and with the batter being so thin, I was worried they would spill out and all have flat tops that ran into each other.  But I was pleasantly surprised to find nothing of the sort when I went to check on them.  They aren't the prettiest muffins ever, no pretty domed tops, but at least they didn't spread out and make a mess.  I had to bake them longer than what the recipe called for to get them golden brown.

Despite the bland color of the peaches, these muffins were really great.  I tried a bite of one and wish I could have eaten more.  They were a hit at the study group.  I can't wait for my girls to try them when they get home.

Be sure to check out all the other great peaches and cream recipes below and come back next month to see what I make with garlic and rosemary.


21 April 2016


It's time for this month's Improv Challenge.  The premise of the Improv Challenge is easy: each month there are two assigned ingredients.  The participants must make a recipe using both ingredients and blog about it. 

This month's ingredients were ham and cheese.  Awesome!  My husband and I have been eating low carb for over 9 months now, so ham and cheese are pretty much staples in our diet. I had lots of things I could do this month. In fact, I have another post all ready to go that also involves ham and cheese.  

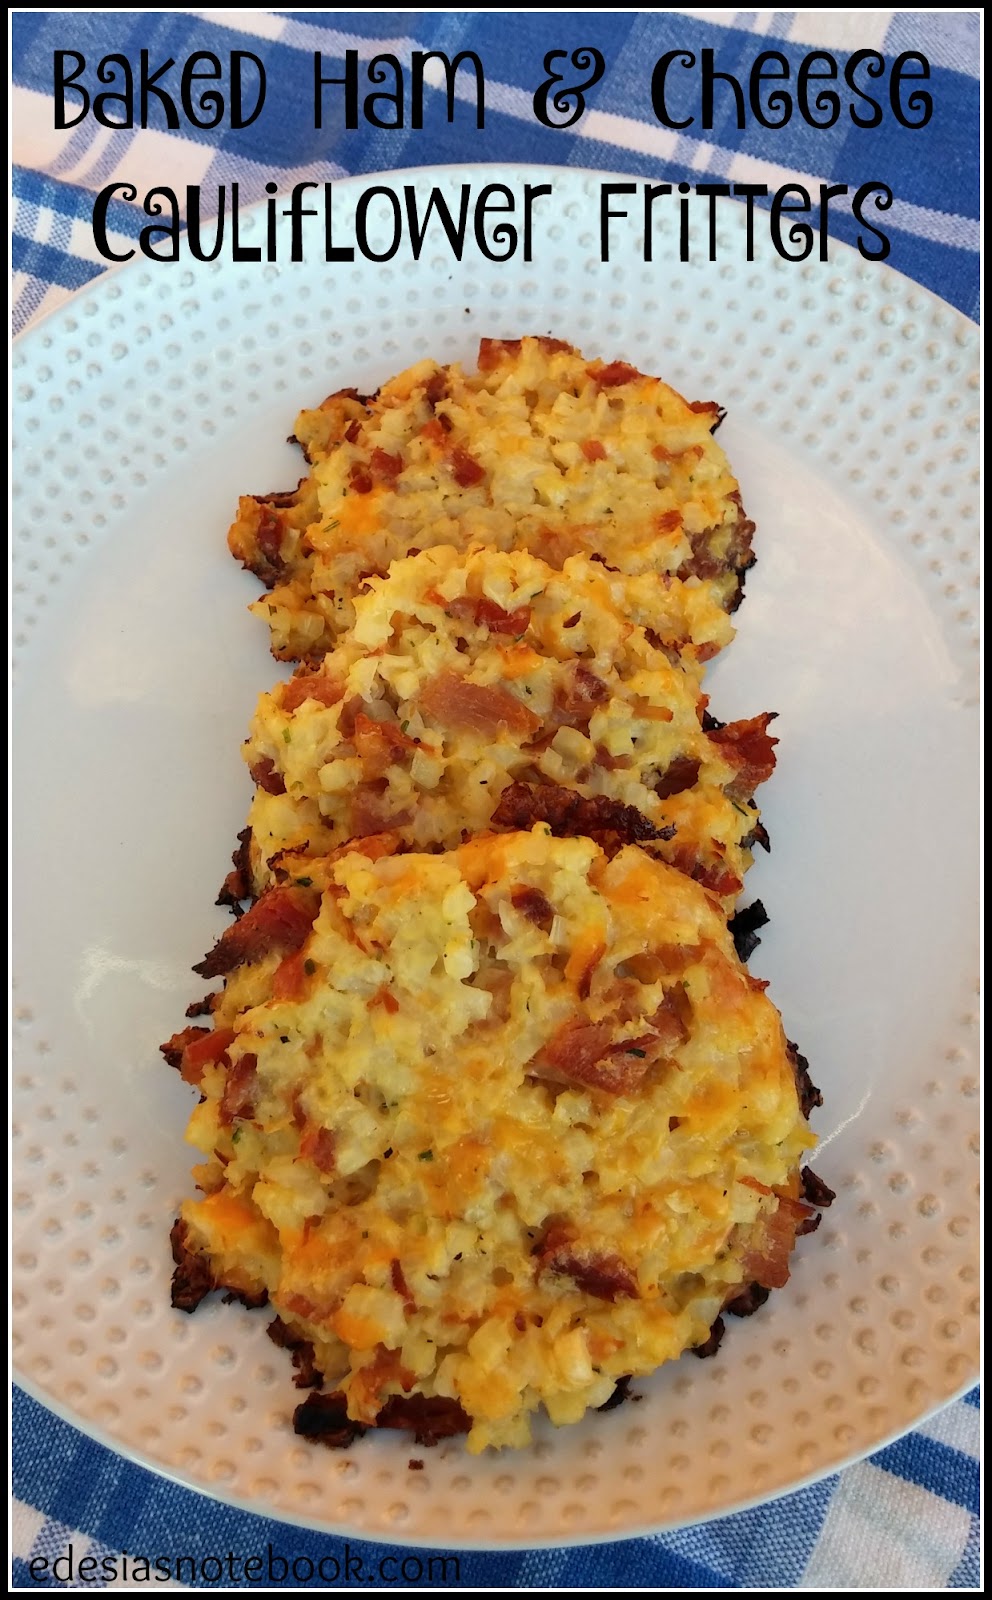
This is a new recipe I just tried last weekend.  It's basically chopped up cauliflower, ham, and a generous amount of cheese mounded together into patties and baked. My recipe is an adaption from All Day I Dream About Food.  

Baked Ham and Cheese Cauliflower Fritters

Ingredients:
Olive oil
2 (12 oz.) packages frozen riced cauliflower
2 cups finely diced ham
2 tsp Sunny Paris (or other onion-y salt-free seasoning)
2 eggs, beaten
2 cups shredded cheddar cheese
½ cup grated Parmesan

Directions:
Preheat oven to 400°.  Generously grease two baking sheets with olive oil. (I use stoneware.)

Place the cauliflower in a large microwavable bowl.  Break up big chunks, if necessary.  Microwave on high for 4 minutes.  Stir, break up chunks again.  Microwave on high another 4 minutes, or until cauliflower is warmed through and somewhat soft.  

Add the ham, Sunny Paris, eggs, shredded cheddar, and Parmesan.  Stir well.  Make 16 patties using a rounded ¼ cup of mixture for each one.  Place on the prepared baking sheet.  

Bake for 20 minutes or until browned on the bottom.  Remove from oven and let cool a few minutes before serving.  Carefully remove them from the baking sheet to a serving platter.

Makes 4 servings of 4 patties each.


I wasn't feeling too great the day I made these, so I took the easy way out and used frozen riced cauliflower instead of chopping fresh.  I got this stuff from Trader Joe's, but I know Walmart also sells bags of riced cauliflower in the fresh produce section.  If you can't find either of those handy products, you can finely chop a head of fresh cauliflower and either boil or steam it until it is softened.  Just be sure to drain it well before adding the other ingredients.

The other major thing I changed was that I baked these instead of pan frying.  I knew they would be too loose for me to successfully flip them in the skillet.  I've never had great luck with that.  So I baked them instead.  Easy peasy and worry-free.  I intended to flip them once during baking, but I couldn't do it without them falling apart, so I just cooked them on the one side.  I think that turned out just fine.  They got a nice caramelized crunch on the bottom that I found delightful.  I may have had better luck if I had mashed the cauliflower after cooking it in the microwave, but I am okay with the way they turned out.

My family LOVED these.  My husband raved about them.  I thought my carb-loving daughters might turn up their noses at them, but I was wrong. They both loved them too.  My eight-year-old had seconds.

I used Penzeys Sunny Paris as the seasoning in these.  If you don't have that. feel free to use anything else you like.  I would recommend a salt-free seasoning because the ham and cheeses provide plenty of salt.  Something with onion and/or shallots would be great.

I list four patties as a serving size, but that is going to vary greatly depending on who you are feeding.  Kids will definitely not eat four at once.  I did, but that was all I ate for dinner; I didn't feel well enough to make the salad I had planned to go with them.  We had some leftover, and my husband had a great idea: to serve fried eggs over them in the morning.


Like the plate? I painted it myself! :)


Yummo!  They made a great breakfast.

I used up some Easter ham for this; it was so good.  But it would be good with any kind of ham.

Be sure to check out all the other great ham and cheese recipes below!


09 April 2016


This is the "pie" I made on Pi(e) Day, March 14th. My husband and I are eating low carb, so my pie options were of the savory sort, pretty much taco pie or cheeseburger pie. My husband loves the cheeseburger pie I tried once, but I was pretty "meh" about it. I was eager to try this taco pie recipe again though, because it didn't turn out so well the first time I made it. I got the recipe from All Day I Dream About Food.  The directions do not say to mix the meat with the egg mixture.  So the first time I made it, it ended up with only meat on the bottom and only fluffy eggs on top.  And the meat part was watery.  It was kind of weird; like a fluffy omelet on top of taco meat.  But I decided to try it again, making a few tweaks.  This time I found success.  Here's how I made it.

Taco Pie

Ingredients:

1 lb. ground beef
2 tbsp taco seasoning
6 eggs
1 cup heavy cream
1.5 oz. queso fresco, crumbled (optional)
1 cup shredded cheese

Directions:

Preheat oven to 350°.  Coat a 9” pie plate with baking spray.

Brown ground beef in a medium skillet.  Drain, if necessary. Add taco seasoning and stir well.


In a mixing bowl, beat the eggs.  Add the cream and mix well.  Add the queso fresco, if using.  When beef is done, stir it into the egg mixture.  Pour it into the pie plate and top with the shredded cheese.


Bake in preheated oven for 35 minutes.  Remove and let cool at least 5 minutes before cutting and serving.


Makes 8 servings.


Mixing the meat into the egg mixture makes a huge difference.  And I did not add water to the taco meat; not sure what the point of that is.  I also added some queso fresco just because . . . why not?  :)

This was a huge hit with my family.  It's tasty on its own, but I love how you can add whatever your favorite Mexican condiments are.  Sour cream, guacamole, and some fresh salsa was my favorite.  My husband used taco sauce and sour cream.  My five-year-old just did sour cream.  Lots of sour cream.  I swear, that girl is making up for all the years she couldn't have dairy!

This is easy to throw together on a busy weeknight.  And the leftovers reheat well, if you have any.  

Even though this is low carb, the carb-eaters in your household will love it too.  You can serve it with rice or tortilla chips.

I will have to work on tweaking the cheeseburger pie recipe so I like it as much as this one.

I just remembered that I have some ground beef in the fridge that I need to use up.  Totally making this again for dinner tonight!


What I'm Reading Right Now


goodreads.com

02 April 2016


Need to make French toast for a crowd? I've got you covered! This is so much easier than the making the real deal in the skillet, but it has the same great flavor and texture.  The inside is perfectly soft and custardy, while the outside is delightfully crunchy.  

I needed a recipe for our church's Easter brunch potluck.  I was going to make my traditional Eggs Benedict Casserole, but we had a bunch of French bread leftover from our Lenten soup suppers and someone wondered if it could be used for a breakfast casserole on Easter.  Great idea!  My Eggs Benedict Casserole uses English muffins, so that was out.  I asked my fellow Penzeys fans on Facebook for a good baked French toast recipe and several of them recommended one from The Pioneer Woman.  It seemed super easy, which was what I needed because Easter weekend is totally crazy at my house (my husband is a pastor and I'm the church secretary).  This recipe was perfect and it was a big hit at the potluck.

French Toast Bake

Ingredients:
1 loaf French bread (7-8 oz.)
8 eggs, beaten
2 cups whole milk
½ cup heavy cream
½ cup sugar
1 cup brown sugar, divided
2 tsp vanilla extract
½ cup flour
1 tsp cinnamon
¼ tsp salt
½ cup butter, cold
Syrup

Directions:
Coat a 9x13” casserole dish with baking spray.  Cut the bread into 1” cubes and place in the casserole dish.

In a mixing bowl, combine the eggs, whole milk, heavy cream, sugar, ½ cup brown sugar, and vanilla.  Pour this mixture over the bread cubes.  Let it sit for a few minutes, then press down or flip over the bread cubes to make sure they are completely moistened by the egg mixture.  Cover the dish and refrigerate overnight.

In another bowl, combine the flour, remaining ½ cup brown sugar, cinnamon, and salt.  Use a pastry blender to cut in the butter.  Refrigerate.

Remove the dish from the fridge.  Preheat oven to 350°. Uncover the casserole dish and sprinkle the topping mixture evenly over the bread cubes.  Place in the preheated oven and bake for 1 hour to 1 hour 15 minutes, or until the edges are browned and the center is set.  Serve warm with syrup available for drizzling on top.


Makes 8 servings.

I actually made two of these because there were two loaves of French bread left in the freezer at church.  That was good because the first pan didn't last long on Easter morning.  I came home with about a third of the second pan left; just enough to reheat and snap a picture for this post!  I should have gotten a pic of the entire pan, because it was beautiful, but that didn't happen.  Easter morning in the church kitchen is a bit chaotic!

I really do love the Eggs Benedict Casserole, but it is kind of a pain making the Hollandaise sauce right before serving.  I think this French toast bake will probably be my new Easter brunch tradition.  

I got several compliments on this and was asked for the recipe, so that makes it a success in my book!  Give it a try the next time you have houseguests and want to treat them to something special in the morning.


What I'm Reading Right Now


goodreads.com

23 January 2016


It's time for this month's Improv Challenge.  The premise of the Improv Challenge is easy: each month there are two assigned ingredients.  The participants must make a recipe using both ingredients and blog about it.  

This month's ingredients were chocolate and pastry or bread dough.  I had a refrigerated pie crust leftover from Thanksgiving that had one more week left before its expiration date.  Perfect!  And with Valentine's Day quickly approaching, my mind immediately went to one of my favorite flavor combos: chocolate and raspberry.  Mmm.  I kept things super simple.  In fact, I made these while talking on the phone with my mom, and I am NOT a good multi-tasker!  So that tells you just how easy these are.

Dark Chocolate Raspberry Mini Hand Pies

Ingredients:
9" refrigerated pie crust (or homemade rolled out thinly)
Dark chocolate chips
Seedless raspberry jam
1 egg, beaten
Sugar

Directions:
Preheat oven to 350.  Remove the pie crust from the fridge and let it sit at room temperature for 15 minutes.  Carefully unroll.  Using a cookie cutter or a glass tumbler, cut uniform shapes out of the dough.  Place a few chocolate chips and about a 1/2 tsp of raspberry jam in the center of half of the dough pieces.  Brush a bit of beaten egg around the edges.  Place another dough piece on top, lining up the edges.  Press down all along the edges to seal.  Cut a small slit in the center of the top piece.  Brush the tops with a little more egg and sprinkle with sugar.

Bake for about 24 minutes, or until dough is golden brown.  Remove and cool slightly before serving.

Makes about 6 mini pies.

 Here are the ingredients I used (minus the egg and sugar).  The chocolate chips were bigger than the usual. I used three in each pie, but if you are using regular chocolate chips, you might fit more in there.  


Look at that chocolate raspberry gooey goodness!  I only tried one bite, as I eat low carb and it was not my cheat day (I timed that horribly!), but it was heavenly.  My little sweethearts (my daughters) enjoyed the rest.

Please check out the other yummy chocolate and pastry creations below and come back next month to see what I make with tea and honey.


19 November 2015


It's time for this month's Improv Challenge.  The premise of the Improv Challenge is easy: each month there are two assigned ingredients.  The participants must make a recipe using both ingredients and blog about it. 

This month's assigned ingredients were squash and sage. Lovely fall ingredients.  It didn't take me long to decide what to make.  There was a sausage and butternut squash skillet recipe in an issue of Everyday with Rachael Ray that I had been wanting to try for a while.  Sausage, squash, and sage seems like a fantastic combo.  This was the perfect opportunity to try this dish.  I changed it up a little bit (of course!), the biggest change being the addition of goat cheese.  It just seemed to fit.  Here's how I made it.

Sausage, Squash, and Goat Cheese Skillet

Ingredients:
2 lbs. ground sausage
4 cups butternut squash, ½” cubes (1 lb.)
2 tsp dried sage
½ cup beef broth
½ cup goat cheese crumbles

Directions:
Heat large skillet over medium heat.  Add sausage and break up with a spoon.  Cook until sausage is browned and fat has rendered.  Add butternut squash and dried sage.  Cook for 3-4 minutes, stirring occasionally.  Add the beef broth, cover, and reduce heat to low.  Cook for 10-15 minutes, stirring occasionally, or until squash is tender.  Uncover, stir, and let cook for just another minute or two.  Remove from heat and top with goat cheese crumbles.

Makes 6 servings.

Nutrition Info
Per Serving
Calories:  444
Fat: 34
Sat. Fat: 12
Cholesterol: 112
Sodium: 906
Potassium: 282
Carbs (net): 8
Protein: 25
Vitamin A: 170%
Vitamin C: 28%
Calcium: 4%
Iron: 10%

Oh man, this was so yummy!  And besides cutting up the squash (which I always hate!), pretty easy. I wanted to buy the pre-cut squash in a bag, but my store didn't have it. I bought the smallest butternut squash they had, and it ended up being the exact perfect amount for this recipe.  Love it when that happens!

Any of you who are fans of the sweet and salty combo will love this dish.  The sweetness of the squash is so perfect with the saltiness of the sausage and the creaminess of the goat cheese.  Mmm.

I used dried sage because I can never chop fresh sage small enough so that I don't feel like I'm eating bits of leaves.  Not palatable for me. I only use fresh sage for stuffing in a turkey cavity. :) But the dried was perfect for this recipe.  I know you can buy a sage variety of sausage; if you do that, you might want to cut down on the dried sage you add.  

I used beef broth because I happened to have an open container in the fridge. You can certainly use chicken or veggie broth instead. Water would even be fine if you didn't have any kind of broth.

My husband and I have been low carbing for a while now, and I have not allowed myself butternut squash yet this fall. :( So sad, I know! I love butternut squash, but it is a little carby.  But I was glad when this came out to 8 carbs per serving, because that is totally doable.  I consider any main dish recipe under 10 carbs/serving to be low carb, so this counts for me.  This dish kind of reminds me of one of my favorite pasta dishes: Roasted Squash and Sausage Pasta.  This is kind of the low carb version of that!

This will be my go-to dish whenever the butternut squash cravings get too much to bear.  Looking forward to having the leftovers for lunch today!

Be sure to check out all the other great squash and sage recipes below and come back next month to see what I make with cranberry and orange.


06 November 2015


It's time for another All Whisked Up reveal.  The members of Wisconsin Whisk get together and secretly peruse another blog and make something fun to share.  


This month I was assigned the blog Wisconsin Fun Next Exit written by Erica.  Erica lives in Madison and considers herself a "mostly vegetarian".  

Erica has lots of great recipes on her blog.  I nearly chose her baked cheesy eggs; and I still want to make those!  I am always looking for new ideas for breakfast.  But then I saw this cheeseball, and I knew I had to make it.  Like Erica's family, my family always served cheeseballs at holidays.  It was kind of a special occasion thing.  I love how this recipe is personal to Erica.  She even included a pic of the recipe card her grandmother hand-wrote.  Love it!  I had never made a cheeseball with olives in it, but I thought it sounded genius.  

Cheddar Olive Cheeseball

Ingredients:
8 oz. cream cheese, softened
4 oz. sharp cheddar cheese, grated
1 tbsp toasted onion flakes (or regular onion flakes)
10 green olives stuffed with pimento
½ cup pecan chips

Directions:
Place cream cheese in a mixing bowl.  Add cheddar cheese and onion flakes.  Pulse green olives in food processor until chopped, but not pureed. Add to cheese mixture and stir well.  

Lay out a piece of plastic wrap and place the pecan chips in the center.  Form cheese mixture into a ball shape and place it on the pecan chips.  Roll it around to cover with the pecans.  Close up the plastic wrap around the cheeseball and refrigerate for 4 hours.  

Remove from refrigerator and let soften a bit before serving.

Makes 6 (2.5 oz.) servings.


This is a really great cheeseball.  And it really couldn't be simpler to throw together.  I cut Erica's recipe in half; I think hers was meant to make two cheeseballs.

I used Penzeys Toasted Onion Flakes, but regular onion flakes will work fine too. 

Don't you just love the little flecks of red and green inside?  Perfect for Christmas!  

I enjoyed getting to know Erica and her blog this month.  Thanks for a great recipe, Erica!

Be sure to check out all the other great Wisconsin bloggers below.